


This post is years in the making. I’ve chased clear, plump, even-toned glowing skin my whole life. Haven’t we all?! I remember telling my mom’s friend who was a seller of a popular skincare line (ahem, Mary Kay) when I was a teenager that I was looking for moisturizing and “plumping” products. She laughed and said I didn’t need those products for decades yet. In my head I thought “an ounce of prevention is worth a pound of cure” but I politely nodded and let her talk to me about products for my teenage sensitive acne-prone skin. Note that I didn’t have many problems with blemishes at that time. …Yes I was a lucky duck!
Two pregnancies threw my hormones off way worse than my teenage years and now, things were serious. I took action. Actually, I took a lot of actions. Some of them hurt my skin more than helped it. I had painful acne, dry skin, you name it. After hitting a wall and feeling so hopeless, I decided to simplify. I stripped back, took some great advice from skincare heroes of mine (both online and IRL) and ended up finding a beautiful system that is easy to keep up with.
Regular facials, the best skincare and access to new technologies to keep us healthy are not within reach for most of us. And if you want to keep things environmentally friendly and non-toxic – aka, healthy for yourself and the planet – we can’t exactly go for whatever 10-step Korean beautification routine we’ve seen on YouTube.
That’s okay! You can still get beautiful, clear skin with these simple and zero-waste-friendly … oh and did I mention wallet-friendly?! steps.
Step 1: Drink a &$*% ton of water.
I don’t care who you are, you probably don’t drink enough water. I know I drink more water out of a big container with a straw, so that’s what I have. You do you, boo. But if you know you won’t go fill up your dinky little cup or water bottle every hour, get a big honkin’ bottle.
Step 2: Only wash your face with water* in the morning.
I can feel you ready to comment that this is cray cray. Maybe it is, but it works for me, and I feel like I’ve done enough advanced skincare algebra with my poor face as the guinea pig that I can say with 100% certainty that this might work for you too. I “wash” my face with cool (not cold, not warm) water in the morning and apply a light layer of moisturizer (the one linked here is seriously my favorite – it’s “Paleo” and it’s made in Vermont) or I spritz my face with this rose water and gently pat in a lightweight facial oil like this one I’ve been using and loving the past year. More on moisture later, though, darlings.
Step 3: Sunscreen
Protect your skin from the (glorious) sun’s rays, lovely friends!
If I know I’m going to be hanging out in direct sunlight at the beach all day, I will only use this Raw Elements tinted facial sunscreen. It comes in a zero waste friendly tin! It is heavy but it’s never caused me to break out or have a reaction. I do make sure to oil cleanse on nights I’ve used it, though, just to make sure it’s 100% off my skin.
Otherwise these (sorry, pricey) guys get me through day-to-day.
- Kari Gran SPF
- Coola Face Sunscreen – this comes in a plastic tube but it lasts a while and it’s lovely on the skin
- I haven’t tried this yet but I have high hopes for this Goddess Garden Daily Sunscreen – plus, pretty affordable!
Step 4: Cleanse your skin at night.
I cleanse my skin in three different ways, which I go into depth with below. I know my skin and this system well enough now to know what combination of the three different ways of cleansing I need at any particular moment or season.
Oil Cleansing
Oh man, has OCM (Oil Cleansing Method) blown. up. in the past few years. In my opinion it’s the best way to remove any kind of makeup from your face. My favorite brand of oil blend is hands down Kari Gran Cleansing Oil. Shipped and packaged very zero waste-friendly. I did a lot of DIY blends and I’ll be honest, they angered my skin. If I’m not using Kari Gran, I’m using organic sweet almond oil, which you can often find in glass bottles. It’s inexpensive but high quality and versatile. You can use whatever oil or oil blend you want, but using just one multi-purpose oillike sweet Almond works well for my sensitive normal-to-combination skin. In my experience (and many other people’s experience), olive oil and coconut oils are the worst to use for OCM as they are highly comedogenic and will clog your pores like whoa.
Spread a thin but slick layer over your face and gently work into skin with circular motions. Enjoy the ritual. Then steam off the oil with a wash cloth soaked in hot (not scalding) water. Breathe deep. Ahhh. Wipe the oil away gently. Okay now you’re all set!
As I mentioned above, I know my skin well. So, sometimes this is the only step I do. Seriously, the ONLY step. To complicate matters a bit, though, I do not oil cleanse my whole face every day. For some reason my skin just does better when I don’t overdo the OCM. I oil cleanse maybe once or twice a week in the summer, and 3-4 times maximum in the winter. I will use oil to remove eye makeup any time I’m wearing it, though.
Diluted Castile Soap
I mean waaaaay diluted. I put a squirt of Dr. Bronner’s Unscented Baby Soap in a glass foaming pump bottle and fill the rest with boiled and cooled tap water. I pump a few pumps onto my hand, gently rub it on my face and splash away with warm water. The end. You can’t get more simple or cost effective.
Raw Honey
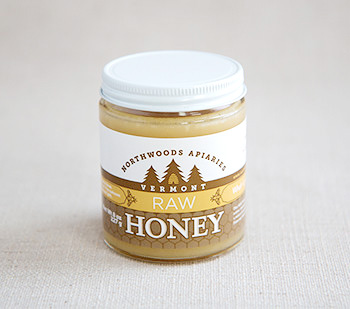
This is where the magic happensssss, folks! If you come away from this post with anything, please make it this. Raw. Honey. Is. Amazing. Make sure you’re using RAW honey. Local if possible. Check your local natural foods store. If you’re curious, this is the one I use. It will effect your skin like a high end product at a fraction of the cost. I dampen my hands slightly under warm water and then scoop a large marble-size of honey onto my palm. And then I proceed to rub that beautiful stuff all over my face. It is not sticky at all. It becomes silky soft like an exquisite sheet set at a fancy hotel. It’s bizarre the first few times you do it but it’s so so lovely. If you’re like me, you’ll be hooked for life. Note that you might feel some natural grainy-ness that will ever so gently exfoliate before melting. Rinse off with a damp washcloth or just with a splash of warm water. You can also use raw honey as a spot treatment on an angry blemish. Just dab it on and wash off whenever you want. I usually leave it on for at least 15-20 minutes.
Washcloths – they’re important!
I am a minimalist in many areas, but not when it comes to wash cloths. I use a new (well, not *new* but clean) washcloth every night. I repeat: Do not use the same washcloth every night, especially if you oil cleanse. Go grab a pack at Marshall’s or Target if you want. I love these amazing organic cloths from Etsy and also really like these super-soft bamboo washcloths — both are soft and stay that way wash after wash. This little extra bit of laundry helps my skin a lot. I keep a stack of fresh washcloths in a drawer and it’s never felt like “too much” to store or handle.
Step 5: Moisturize!
I always mist on a hydrosol, rose water or even just plain water after cleansing and before putting on any oils or moisturizer. I use this glass spray bottle which gives a nice fine mist. The plastic spray top is pretty unavoidable but these hold up relatively well. This is an essential step because the oils will “lock in” the moisture provided by the mist. You can put oil on a dry face but it will take forever to soak in, if ever.
This is where I get creative and try out lots of things. Though the last year I’ve been pretty loyal to two moisturizers. The first is the Sensitive/Normal cream from Caroline’s Dream. A little goes a long way though I can build up more if I need a lot in the dead of (dry dry dry) Vermont winter. It also plays well with oils if you mix them in.
I also like to use facial oils. Right now I’m liking this one by Thesis or I love organic Argan oil. It’s great on hair and all over the body, too.
Bonus Step 6: Lovely extra stuff
To get beautiful skin you really don’t need anything more than what is listed above, imo. HOWEVER. These three little guys have helped boost my skin glow level up to 11. Or some glowy awesome level. All of these you can get from lots of different retailers at lots of price points. I’ve easily found them in glass bottles (that can be reused for DIY gifts or travel!) These get pat-pat-patted on after the mist but before any other moisturizers or oils.
- Organic Rosehip Seed Oil
- Hylauronic Acid
- Vitamin C Serum – please note the one I’ve linked (and tried, and liked a lot) is made so you can safely wear it out during the day, but many Vit C serums make your skin light sensitive. Read your labels and instructions carefully.
Hope you’ve enjoyed this post! I’m spilling all my “secrets” here that I’m glad to share – it wasn’t easy to find a zero-waste, (mostly) plastic-free system that provided results. I want everyone to be able to have access to their best skin, not just gals (and guys, and those who do not identify with either gender) with deep pockets and Bergdorf facialists on speed dial.

Great post Meredith! Thank you!
I’m so glad you enjoyed it, Karen!
Hey Meredith!
I love love love this post! I especially have been loving the honey as a spot treatment part, I’ve been using that regularly since reading this.
Your comment on there not seeming to be any plastic free alternatives to plastic spray nozzles for misters got me thinking about why that is, so I did a little digging and I found these glass/aluminum and pretty affordable bottles (https://www.amazon.com/dp/B07464NBLT/_encoding=UTF8?coliid=I32GQZFD5PZVTZ&colid=3TG8BXQQ8TYP5&psc=1). I hope maybe that helped in some capacity!
Have a wonderful day ❤
Oh I’m so glad the raw honey spot treatment is working for you! And what a cool idea to use a plant mister – I will definitely have to try one! Thanks for reading and the comment 🙂